
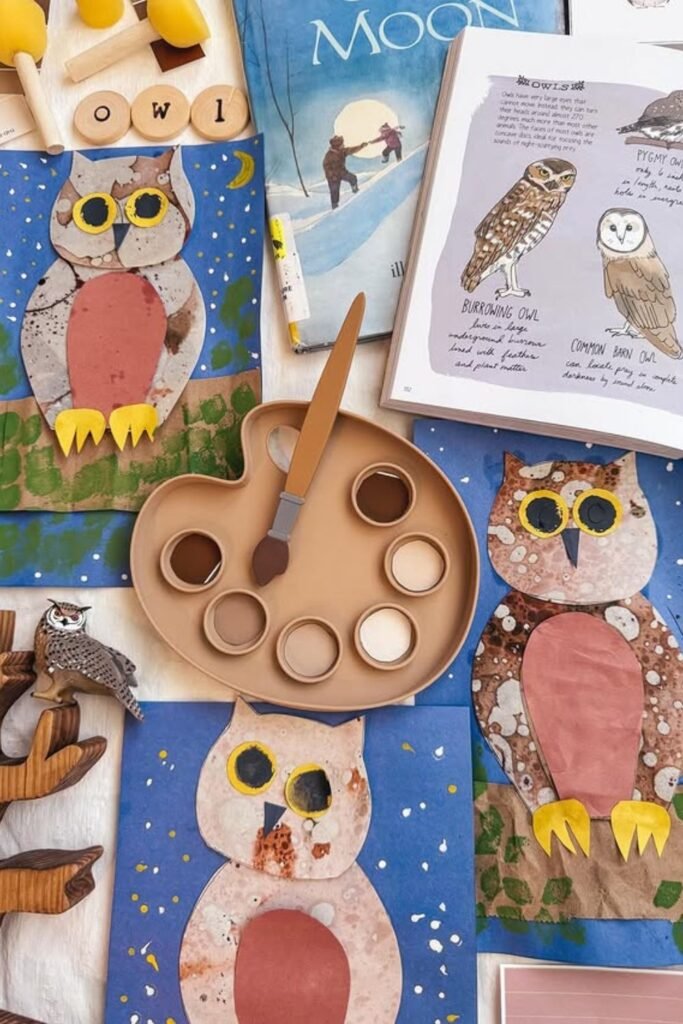
24 Owl Craft Ideas For 2026
Every time you plan an owl craft, it begins the same way. You look at ideas online, get enthusiastic, and then you remember that they won’t work.
There are too many supplies, too much mess, and half of them aren’t even at home. Kids get bored quickly, and what was once a “fun activity” becomes stressful.
The reality is that owl crafts don’t fail because they aren’t creative; they fail because they are too intricate.
In this article, you’ll explore 24 creative Owl craft ideas for kids that keep hands busy and minds engaged in 2026.
Let’s jump in!
How Can You Make Owl Crafts More Fun Without Buying Expensive Supplies?
Things go wrong when you think that fun owl projects need specific kits or trips to the craft store.
Kids don’t care if the materials are flawless. They want to be free, have color, and feel like they are in charge.
When materials are low, people get creative. Kids stay longer, try new things, and enjoy the activity instead of hurrying to finish if you use.
What you already have and vary how you present it. Let’s go over exactly how to do it without spending any more money.
Save this article for later!👇👇👇

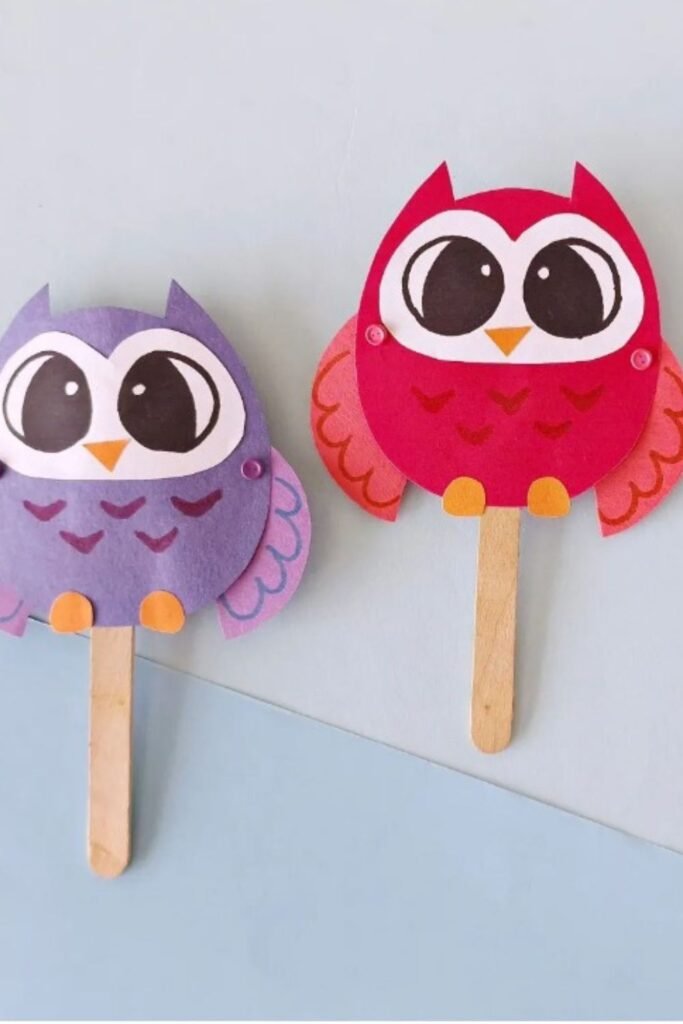
Owl Puppets
Instant playtime is what makes this craft work so well with kids. Once the owl is glued onto a popsicle stick.
It stops being “just a craft”. And becomes a character they can move, talk to, and make up stories about.
This idea is great for classrooms, rainy afternoons, or quiet time because it combines crafting with pretend play.
To make it again, use colored paper or cardstock, cut out simple owl shapes, and let the kids pick the size and color of the eyes.
The stick becomes a handle, and it also provides youngsters control. Moving around keeps them interested longer than flat paper crafts do.
Button Owls
Buttons instantly turn a simple paper owl into something kids want to touch and show off.
Even though everyone starts with the same basic shape, each owl is unique because of its size, color, and texture.
This craft is great for youngsters who like to sort and choose, especially when things are peaceful in the classroom or at home on a quiet afternoon.
Use pieces of paper for the body, thick paper or cardboard for the wings, and spare buttons for the eyes. Adding twine or yarn gives it a rustic look without costing more.
Let kids mix and match materials anyway they like. The more choices they have, the more interested they will be in creating and decorating their owl.

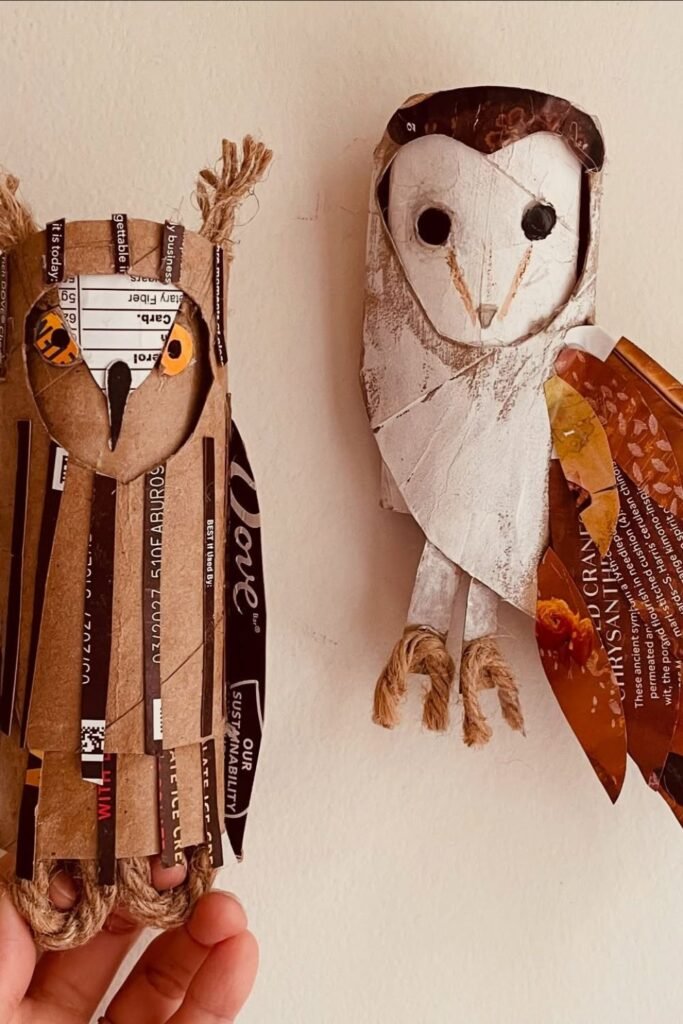
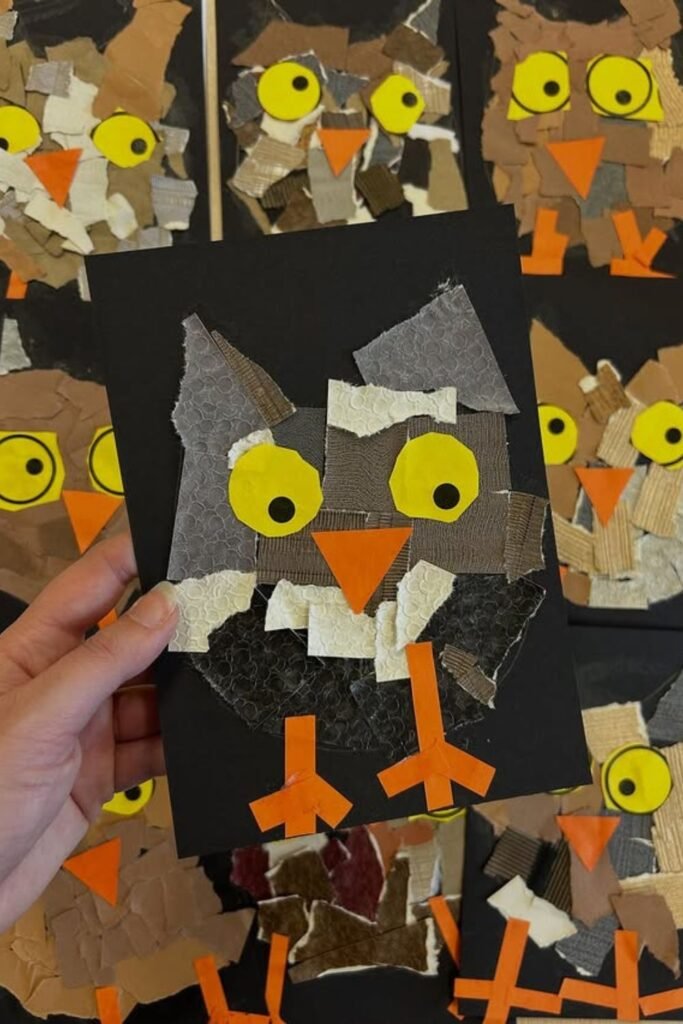
Recycled Owls
Scrap materials suddenly feel special when kids realize trash can turn into wall art. Cardboard strips, old packaging.
This owl has texture from paper and magazine pages, so you don’t need paint or special tools.
This approach is great for older students who like to layer and solve problems, such when they’re doing art projects or lessons about the environment.
Cut out a simple owl shape from cardboard and then let the kids use paper scraps to make the body.
Every choice they make impacts how it will look in the end, which makes the process just as fun as putting up the owl.
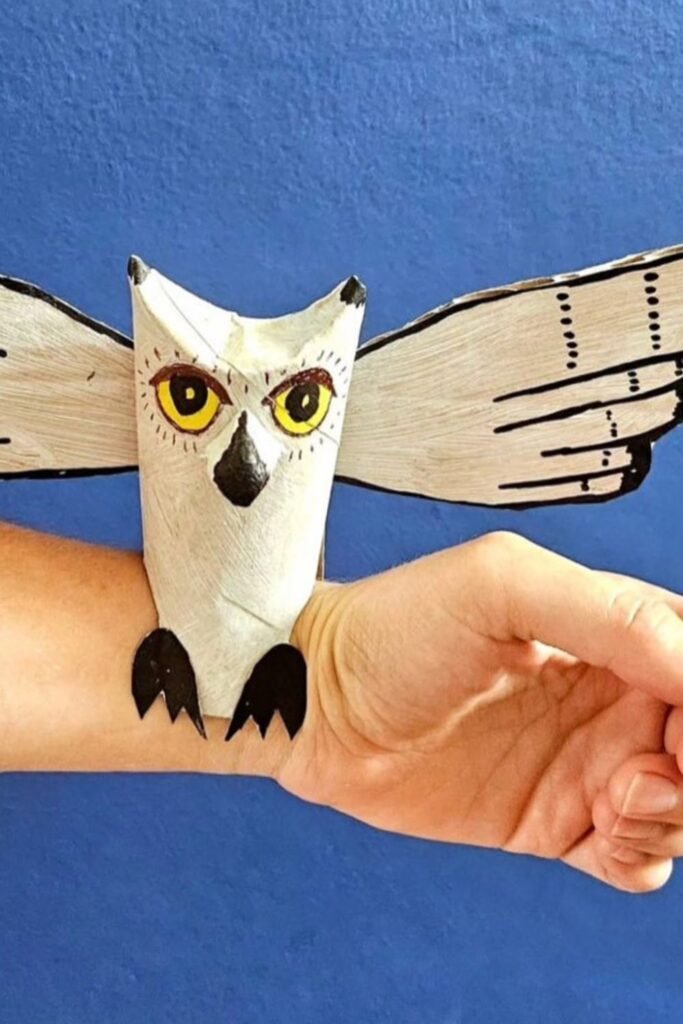
Flying Owls
Movement changes everything for kids. Once an owl wraps around an arm, it stops being a craft and turns into an experience.
This idea is ideal for youngsters who are full of energy and have trouble sitting still while doing crafts at the table.
A cardboard tube makes the body, paper wings stick out, and markers take care of the details.
The charm comes from how it’s worn; youngsters flap, pose, and make up games on their own.
Use thin paper so your arms don’t feel heavy, and keep the shapes of the wings simple.
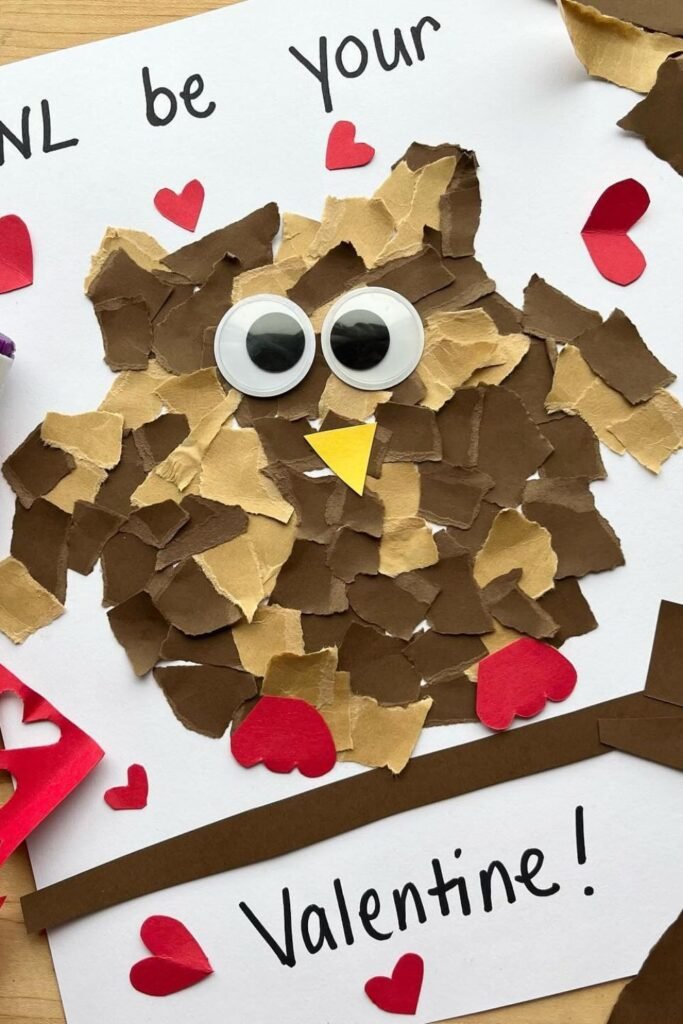
Collage Owls
Tearing paper feels way more fun than cutting it, and kids know it. Small ripped pieces turn into feathers without any pressure to be neat or perfect.
This owl craft is great for days with a theme, like Valentine’s Day, classroom celebrations, or any time you want to merge emotions and creativity.
Scrap brown paper, old envelopes, or packaging do the hard work, while glue sticks make it easy and clean.
Adding googly eyes to the owl makes it come to life right away, and adding heart shapes or words gives it more significance without any further work.
Kids stay focused longer here since the process feels fun and not like they’re being watched. Plus, every finished owl has its own personality.
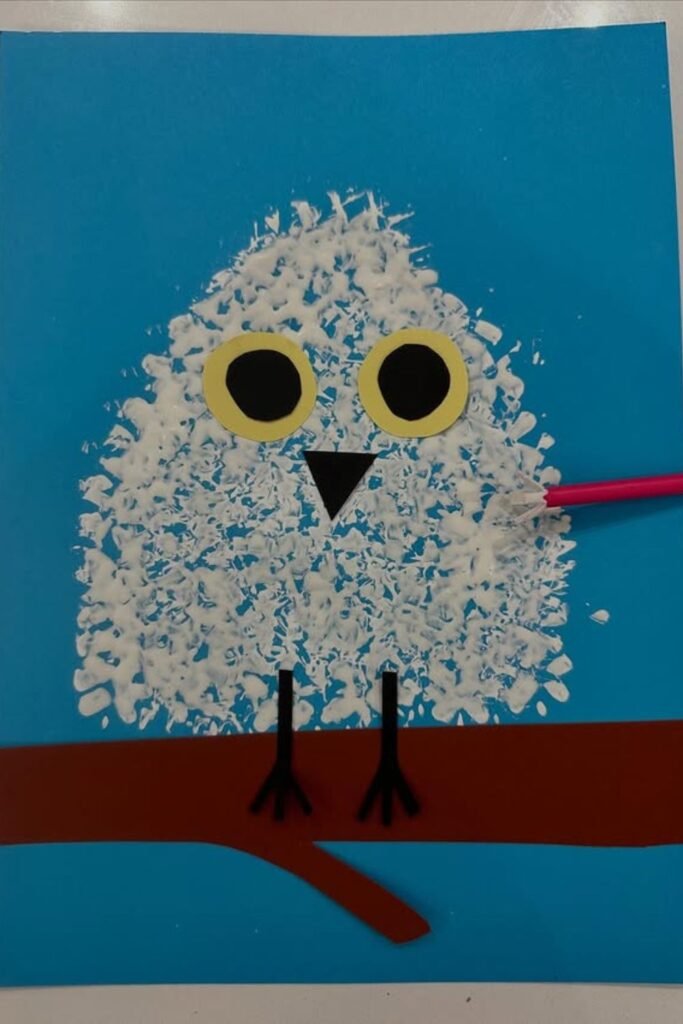
Texture Owls
Messy hands usually mean happy kids, and that’s exactly why this idea works. Dabbing paint with a sponge or crumpled paper creates.
Feather texture without having to be good at drawing. Kids love the freedom here since the goal isn’t to be perfect; it’s to move.
The body is made of white paint, the background is blue paper, and the face is made of simple cut forms.
This craft is great for art centers, sensory play days, or any time kids need a break from using scissors.
If you use small trays and thicker sponges, you can keep the paint under control and make cleaning up easier.
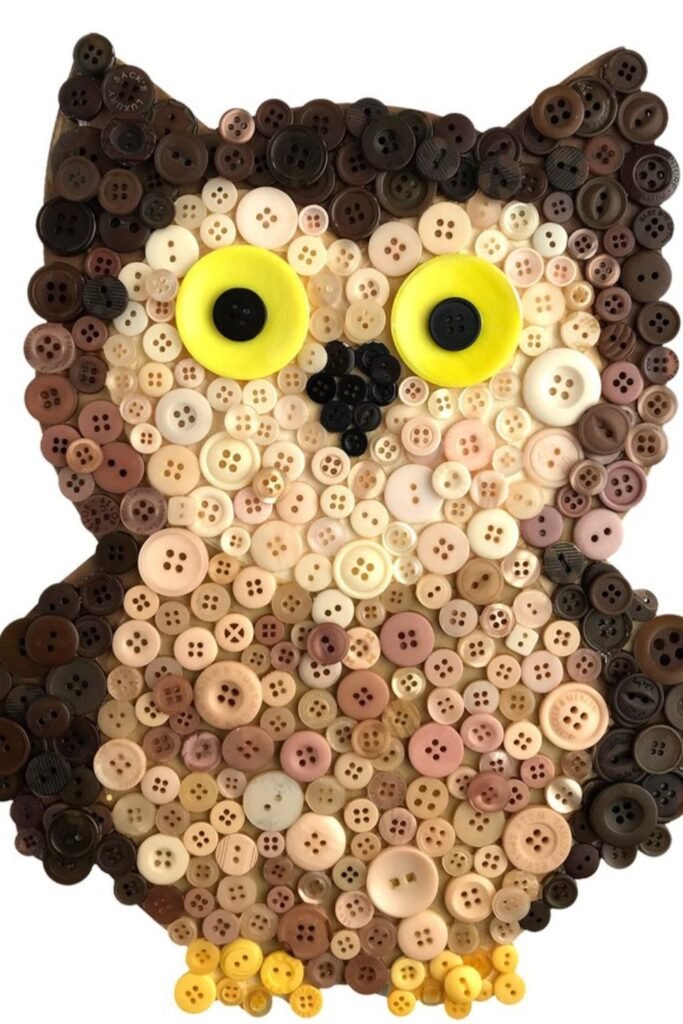
Button Mosaic
Sorting turns into part of the fun with this owl. Kids naturally slow down as they pick colors, sizes, and patterns.
This is great for focused craft time or for kids who finish their work early in class. An owl outline on cardboard.
Provides the piece structure, and worn buttons fill in the gaps like a puzzle. Put the bigger buttons on the eyes first so the face comes together.
Then let the kids use whatever they have to build outward. Here, adhesive dots are better than liquid glue since they don’t slip.
This project is interesting because it looks like a lot of work went into it, but it only requires things that most homes already have.zes, and patterns.
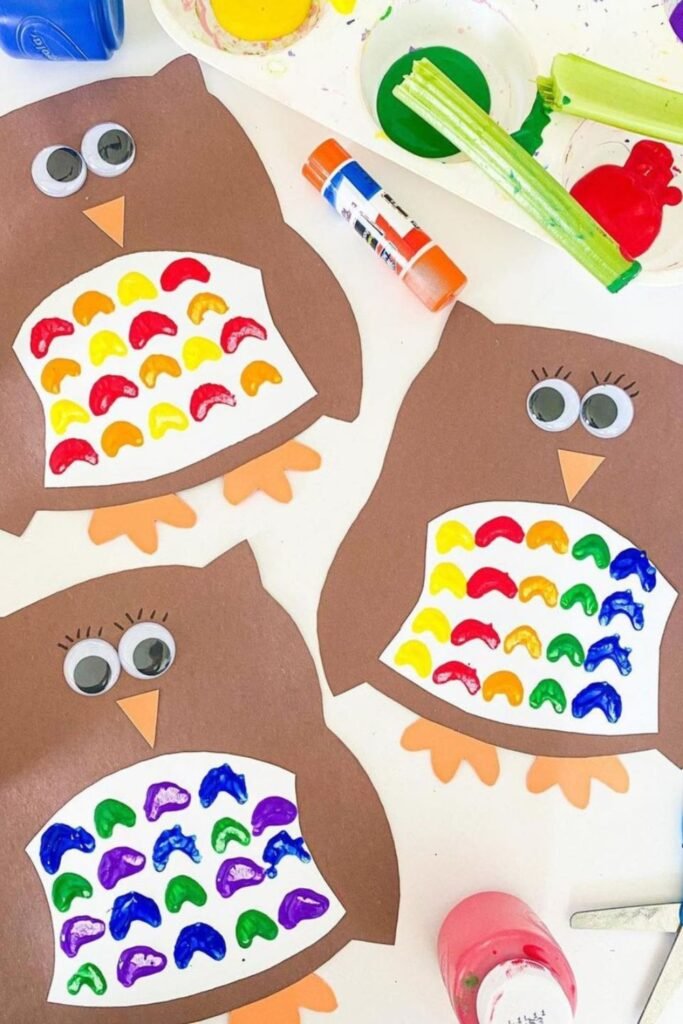
Fingerprint Feathers
Color becomes the main attraction here, not cutting or gluing. Small fingerprints turn into feathers.
And kids love seeing how every press leaves a different mark. This craft is great for preschoolers and early elementary schoolers.
Because it helps them learn coordination without making them feel like they’re practicing.
To avoid overloading them, start with a simple paper owl base and then give them a few paint colors at a time.
Kids can pick any design they want, like rows, rainbows, or random dots. The owl fills up rapidly, which keeps people interested.
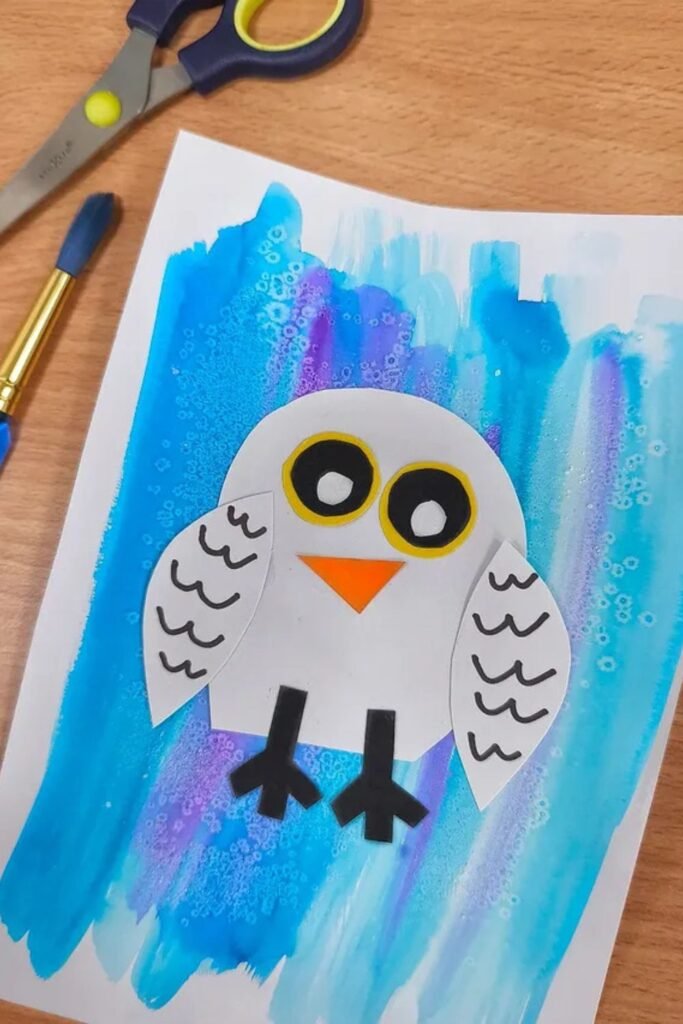
Painted Backgrounds
Color sets the mood before the owl even appears. A loose painted background gives kids freedom to play.
Without worrying about staying inside lines. This is a terrific idea for art days when you want to take your time and not feel rushed.
Let them paint blues, purples, or any other colors. They want on paper first, and then let it dry.
The owl is the last thing to go on top. It was carved out of simple forms and put on. The owl doesn’t need a lot of detail because the setting is already interesting.
Even though the painting isn’t perfect and emotive, every piece looks like it might be framed.
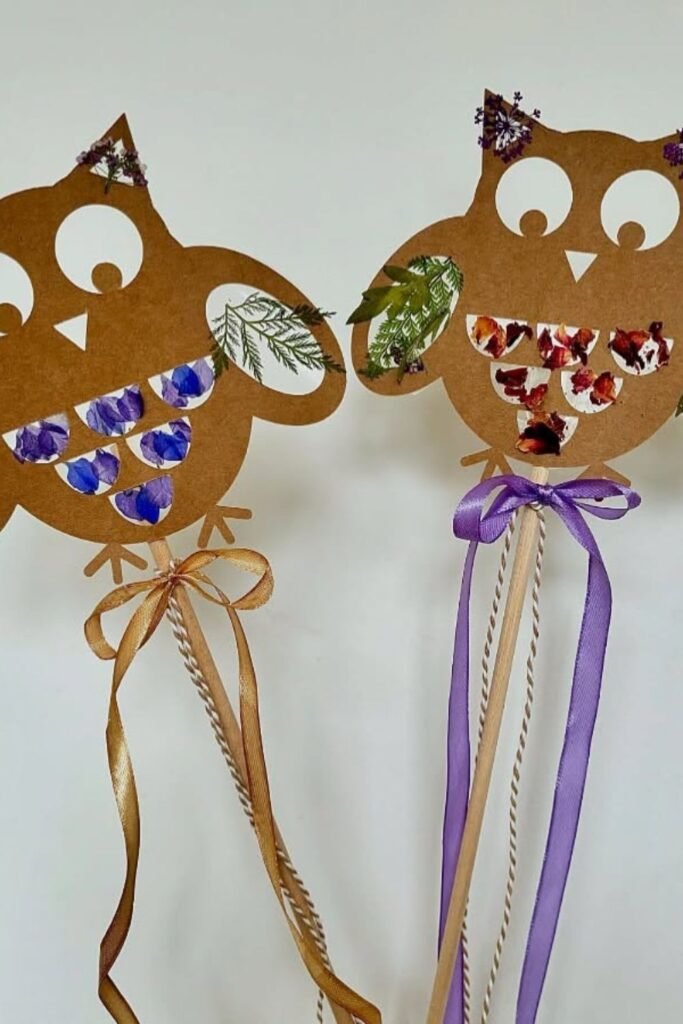
Nature Owls
Fresh air quietly upgrades any craft session, and this one proves it. Leaves, petals, and tiny flowers replace paint while giving kids a reason to slow down and look closely.
This notion works best after a short walk in nature or some time playing outside, when your pockets are already full of “treasures.”
A simple owl shape made of cardboard keeps the focus on decorating rather than cutting.
Use glue to attach leaves to the owl’s wings, blossoms to its feathers, and ribbon to its body to make it look like a wand or puppet.
Kids feel proud when they use things they found in the real world, and the project organically becomes a recollection of where each piece originated from.
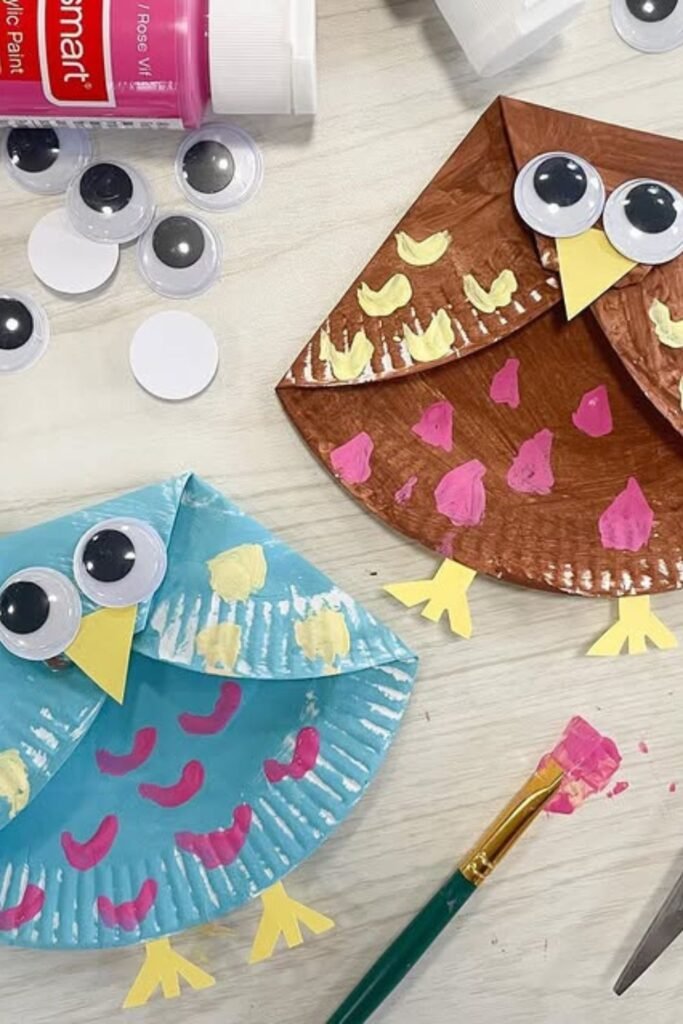
Folded Plates
Folding changes a basic paper plate into something kids instantly recognize as an owl. The moment the top bends down.
The face shows up, and that little bit of information keeps kids interested and attentive.
This activity is great for groups because everyone folds the same way but decorates it in their own way.
You can use paint or marker to color the feathers and googly eyes to give them personality. Use light colors first so that the details stand out.
The plate stays strong, dries quickly and looks full without further layers, which is great when you don’t have much time or patience.
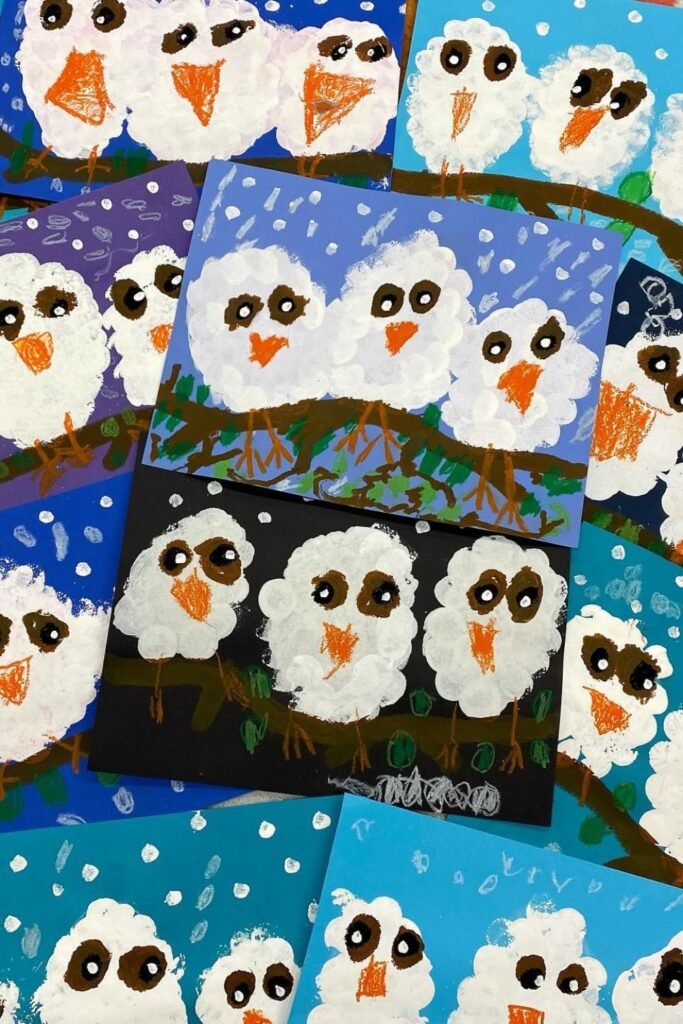
Snowy Owls
Winter scenes invite freedom because nothing has to look perfect. Puffy white paint turns into feathers fast, and kids do not worry about outlines or mistakes.
This project is great for classrooms because everyone has the same basic idea but ends up with vastly varied results.
Blue or dark paper makes the night sky, fingers or sponges make the owl bodies, and simple brush strokes make the branches and snow.
Let the youngsters choose how many owls sit together. A solitary owl makes them feel tranquil, while a bunch makes them feel playful.
The drying time stays short, the supplies stay simple and the finished art gives walls character instead of just reproductions.
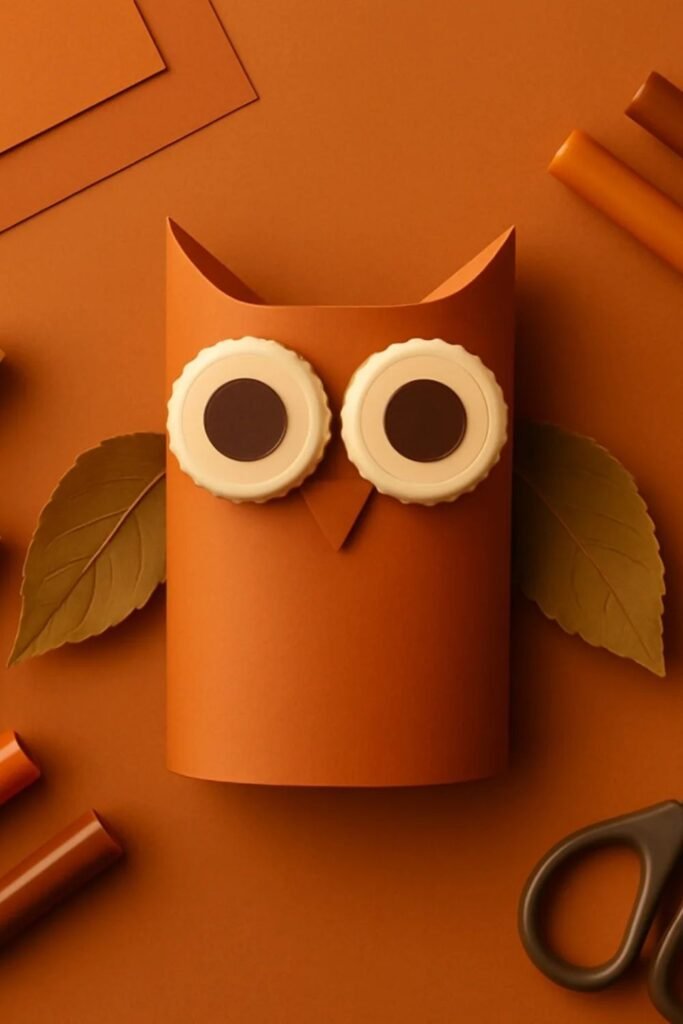
Tube Owls
Rolling paper into a tube instantly gives kids a solid base they can actually hold. That simple shape makes crafting feel easier and more confident.
Especially for kids’ hands. This idea is excellent for fall-themed decorations, desk decorations, or quick crafts for the classroom.
Where the drying time needs to be brief. Colored paper wraps around the tube, and the folded sides make ears.
Bottle caps or layered circles make bold eyes. No further trimming is needed because leaves make great wings.
Kids like how strong the owl feels, and teachers like that it doesn’t need any extra assistance to stand up.
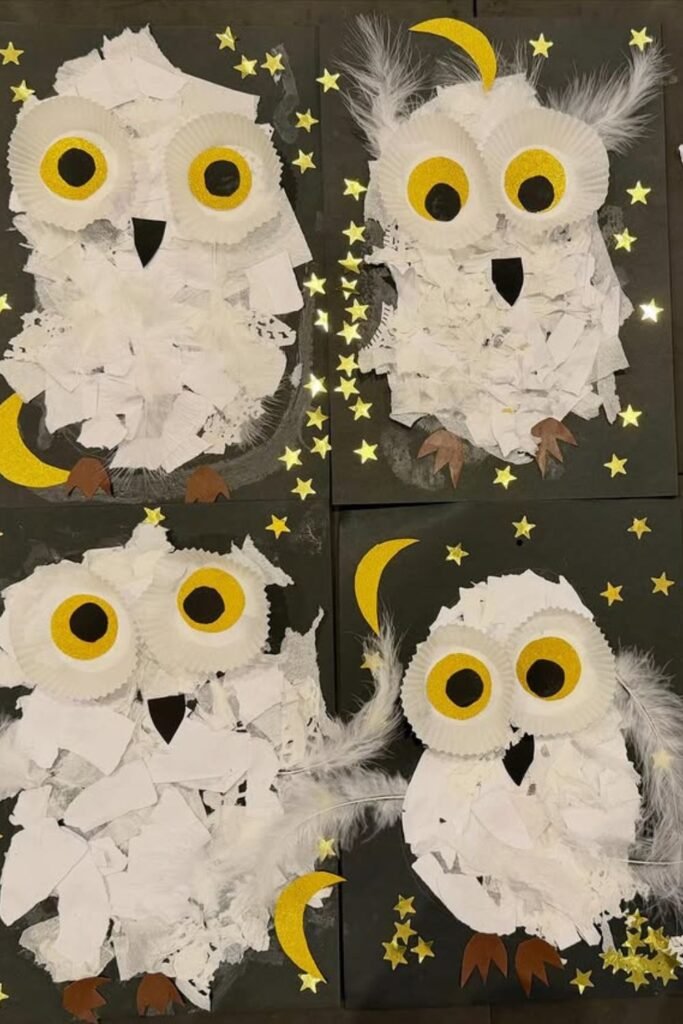
Night Owls
Dark backgrounds make white materials pop without extra effort. Tissue paper, cupcake liners, and a few feathers.
When they sit against black paper, they suddenly feel dramatic. Kids adore breaking and stacking things here since they don’t have to be perfect.
This craft works well for winter themes, lessons on the night sky, or displays in the classroom that need to stand out from a distance.
Start with huge circles around the eyes to keep the face in place, and then let the youngsters add tissue bits to make fluffy bodies.
Gold stars or moon shapes provide just the right amount of shine to polish it off. The result is striking and detailed, even though the procedure is still flexible and forgiving.
Layered Feathers
Depth makes kids stop and stare, and that’s the magic here. Stacked paper shapes turn a flat owl into something that feels almost 3D, even without fancy tools.
This strategy works best for older students or small groups that like to take their time and see progress build up over time.
Cut out simple feather forms in different colors and glue them on from the bottom to the top, like shingles, on top of a solid owl base.
Depending on how confident you are, your wings can stretch out or stay tucked in. The method teaches you to be patient.
Without making you feel like you’re moving too slowly, and the finished owl looks so good that it should stay on the wall for good.
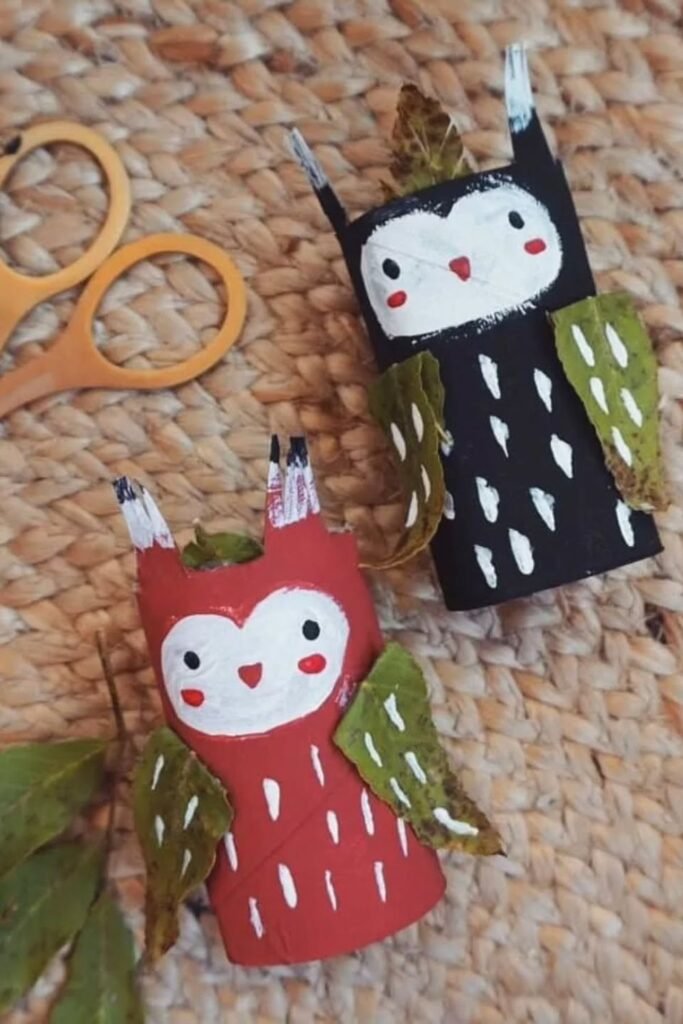
Leaf Tubes
Nature and recycling meet in the easiest way possible here. Small cardboard tubes become owls, and real leaves handle the wings without any cutting stress.
This idea works well after kids have played outside and have leaves in their hands and are interested.
First, paint the tube and let it dry. Then, use white paint and dots to make a simple face. While the glue is still wet.
Press the leaves against the sides to keep them in place. Kids adore how the natural textures.
Make each owl seem different, and no two ever turn out the same, even when they follow the same techniques.
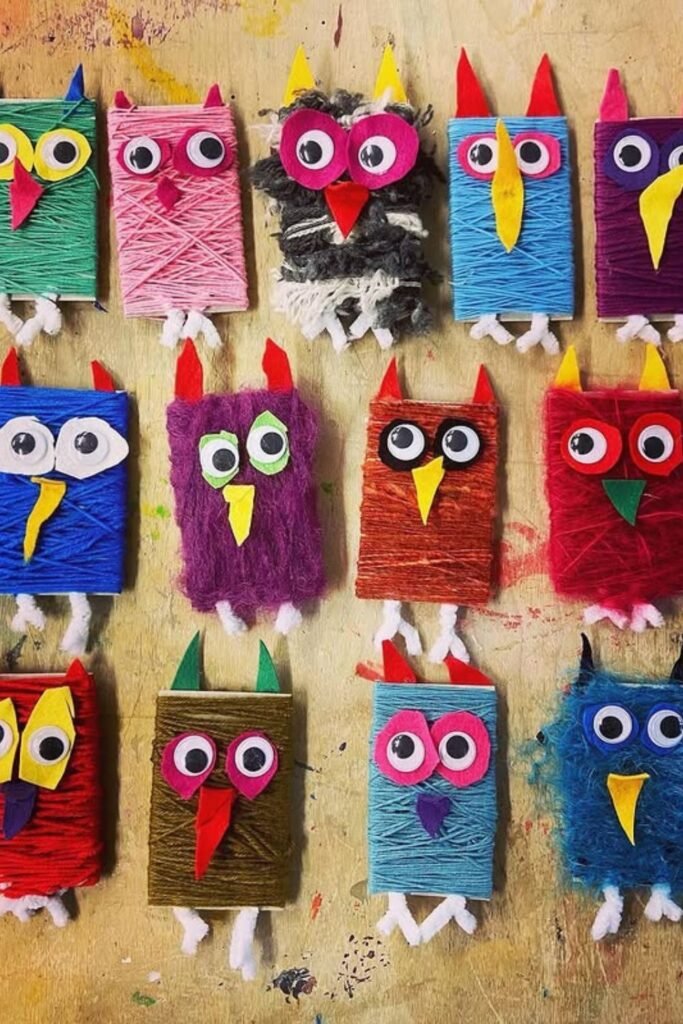
Yarn Owls
Wrapping feels calming, and kids naturally slow down once yarn enters the picture. That’s why this owl works so well for focused craft time or quieter classroom moments.
The base is made of cardboard forms, but the true enjoyment comes from wrapping yarn back and forth until the owl is full.
Felt wings and beaks make cutting easy, and googly eyes give the face an instant expressiveness.
The string at the top makes each owl a hanging ornament for windows, doors, or seasonal displays.
Thicker yarn fills in space faster, which keeps younger kids interested, and the different colors make each owl feel special without any extra work.

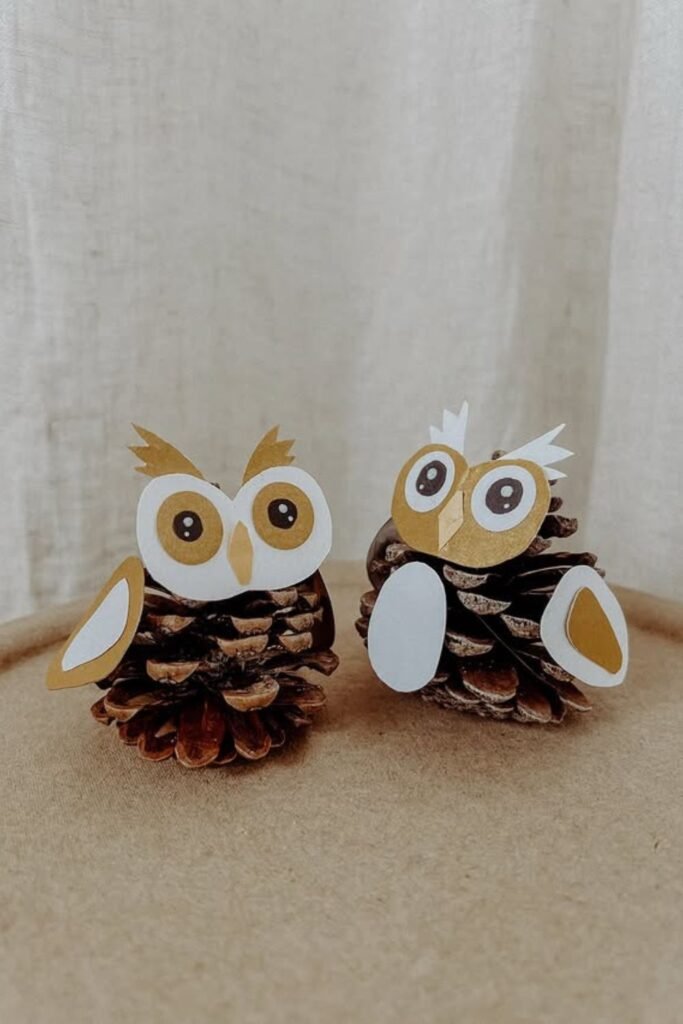
Pinecone Owls
Nature already did half the work here, which makes this craft feel effortless and special at the same time.
Pinecones add texture right away, so kids don’t have to start from beginning to make the body.
This idea works best after a stroll outside or during lessons about fall, when it’s easier to find natural materials.
You can use paper cutouts for the eyes, wings, and beak, and glue to hold everything together.
Kids can add more features to bigger pinecones, while smaller ones fit in their palms.
Wrapped Owls
Color choice becomes the real decision-maker here, and kids love that kind of control. Yarn wrapped tightly around a simple cardboard shape.
Becomes feathers without any sketching or painting pressure. This project is great for groups because everyone follows the same wrapping idea.
But ends up with totally distinct results. Cardboard rectangles make it easy to preserve the shape.
While felt or paper handles make the eyes, beaks, and feet. At the bottom, loose ends convert into attractive legs with very little work.
The repetition keeps hands occupied and minds peaceful, and the completed owls are strong enough to show off without falling apart.
Patchwork Owls
Scraps stop feeling random once kid start fitting them together like a puzzle. Different paper textures corrugated bits.
Soft tissue and package layers give this owl personality right away, without the need for paint.
This project is great for art in the classroom because it employs things that people generally throw away.
Begin with a dark background so that the lighter pieces show out. Then, let the kids create the owl face first to lock in the emotion early.
From there, layering becomes something you do without thinking about it. At the end bright eyes and bold beaks bring everything together.
Felt Flyers
Soft materials instantly change how kids treat a craft. Felt feels special, so they slow down and pay attention without being told to.
This owl is great for older kids or craft sessions when kids are directed and cutting and layering are fun instead of too much labor.
Kids can focus on arranging colors and patterns across the wings because the feather shapes are already cut. You don’t have to sew it; glue works just as well.
But if you add a string to hang it from, it becomes a decorative instead of junk on your desk.
The owl’s large wingspan makes it great for exhibitions, mobiles, or themed weeks where imagination is just as important as the final design.

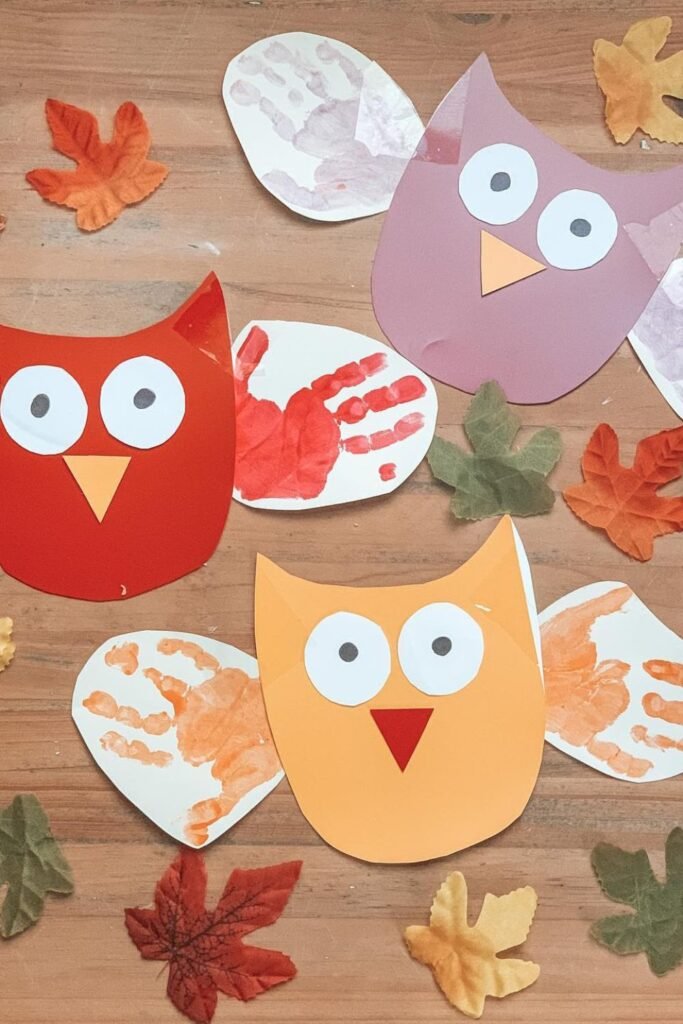
Handprint Wings
Tiny hands steal the spotlight in this craft, and that’s exactly why kids love it. Painted handprints turn into wings.
This makes each owl unique and tough to reproduce right away. This idea is great for preschool, daycare.
Keepsake projects when parents care about the memory as much as the finished product. Place the focus on the prints instead of how well you cut.
Any color scheme works, but fall colors are fantastic. Before putting on the wings, let the paint dry so that the shapes stay clear.
Kids love seeing their own hands become part of the owl, and parents keep these crafts long after craft time is over.
Story Owls
Books quietly guide creativity when kids don’t know where to start. Pairing owl crafts with a story gives them a reference without telling them what to copy.
This idea is great for reading areas, homeschool sessions, or quiet mornings in the classroom.
Read a short book on owls first, and then let the kids make their own owls out of bits of paper, paint, or other textural materials.
Some may pay attention to colors, some to patterns and a few will try to remember details from the story.
The craft is meaningful because it brings together listening, making, and imagining in a fluid way.
Feather Accents
One soft feather can completely change how a craft feels. Kids instantly connect with texture, and that small detail makes this owl stand out without extra work.
This idea works well for small groups or quiet craft stations where youngsters like to add the finishing touches.
Wrapping yarn around things quickly forms the body, while cutting felt shapes keeps things simple and under control.
The feather is the last stage, and it offers youngsters a definite “done” moment that makes them feel good.
Bright colors give things a personality, yet neutral colors work just as well.
The owl seems special, fun, and touchable, which shows that one small detail can make the complete creation.

FAQs
What age group enjoys owl crafts the most?
People of all ages can enjoy owl crafts, but preschoolers and early primary school kids like them the most.
Kids who are younger appreciate basic things like handprints, tearing paper, or stamping paint.
How do you keep owl crafts fun without kids losing interest halfway through?
Kids keep interested when they see development rapidly. Start with a firm basic shape so the owl appears like an owl right away.
Then add details in little amounts. It also helps to provide people options, like colors, textures, or materials.
Hi, I’m Afaf! I’m a law student who loves writing about everyday life – from home projects and crafts to fashion, beauty, and parenting tips.
I’ve been writing for over a year, sharing ideas that are simple, practical, and easy to try. I write about things I find interesting and useful, whether that’s organizing a space, trying a new DIY, or finding activities to keep kids entertained.
My goal is to share helpful ideas without making things complicated. If it works in real life, I’ll write about it.
When I’m not studying or writing, I’m usually experimenting with new projects or scrolling for inspiration!