
20 Hedgehog Craft Ideas For 2026

You may have seen hedgehog projects online that look easy, but when you try one, it ends up being a tangle of glue, bent paper.
And kids who lose interest halfway through. You could not have the best tools, or you might.
Just need something that fits with the time and space you have. That’s why paper plates and cardboard are so important.
In this article, I’m sharing 20 creative Hedgehog crafts kids can enjoy during weekends or free time in 2026.
Let’s jump in!
How Can You Make Hedgehog Crafts Using Paper Plates and Cardboard?
Paper plates and cardboard are the perfect things to use for a hedgehog activity that won’t come apart.
Doesn’t need special equipment, and will keep kids interested. You probably already have both of these things at home.
And they are strong enough to handle glue, paint, and a lot of young hands. The key is to know how to employ them.
So that the hedgehog doesn’t seem floppy or hurried. Once you get the base right, everything else is easier, faster, and much less annoying.
Save this article for later!👇👇👇
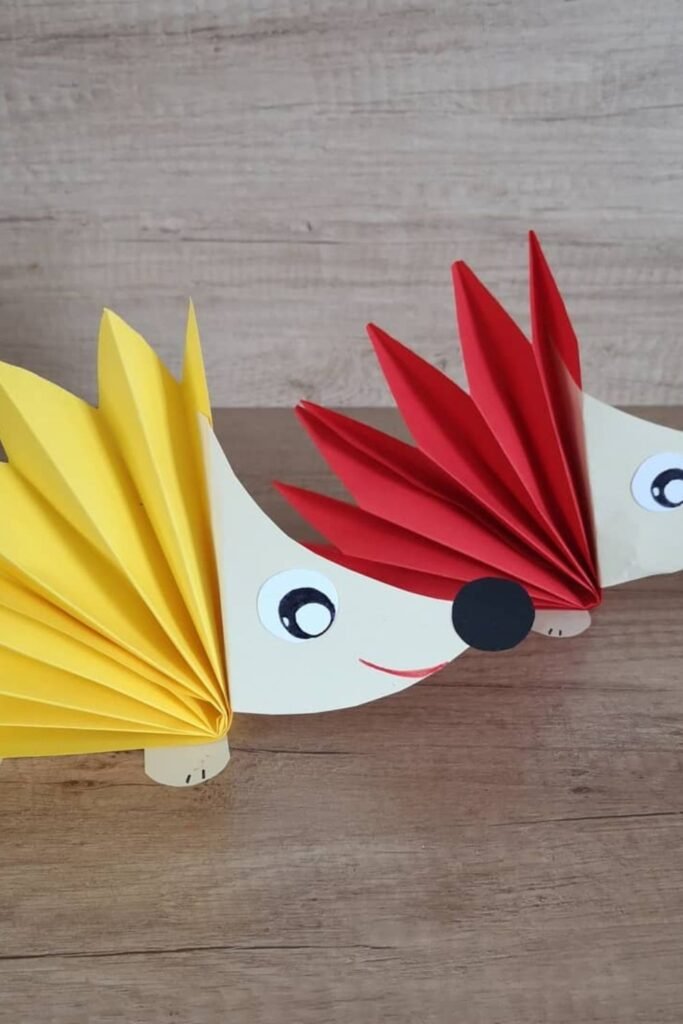
Folded Spines
Accordion folds turn plain paper into instant hedgehog spikes, and kids usually love the folding part more than the gluing.
Help them fold a long strip of colored paper back and forth at first, then fan it out a little bit so it stays in form.
The body should be made of a simple cardboard or paper cutout since it offers the folds something solid to attach to.
This idea is great for classrooms or quiet time at home because there is no paint and very little mess.
Bright colors make it fun, and while softer colors that are great for craft days in the fall.
String Spikes
Threading yarn across cardboard instantly turns a flat hedgehog into something kids want to keep touching.
Kids may wrap thread around the body in any direction thanks to little holes cut in it. This is a great way to help.
Kids improve their fine motor skills without making them feel like they’re practicing.
Cardboard is the greatest material to use here since it stays stiff while the yarn pulls tight.
This notion works great in preschool, therapy, or quiet afternoon activities at home. Limiting the colors avoids things from getting out of hand.
And brighter yarn helps the hedgehog feel fun and brave. First, make a few holes to start with, and then let the youngsters choose the remainder.

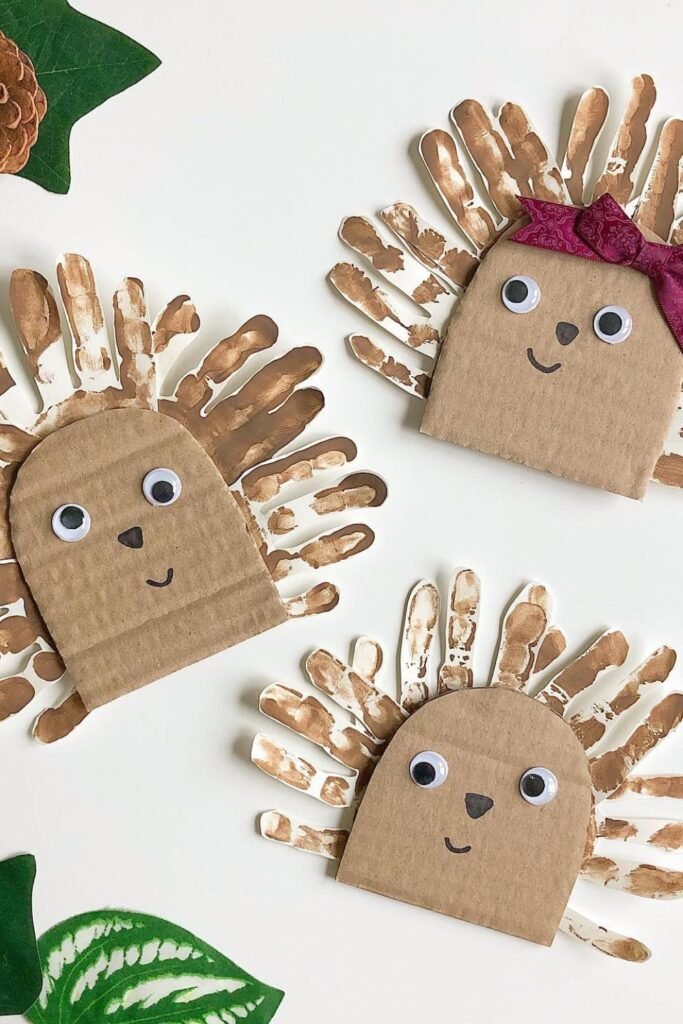
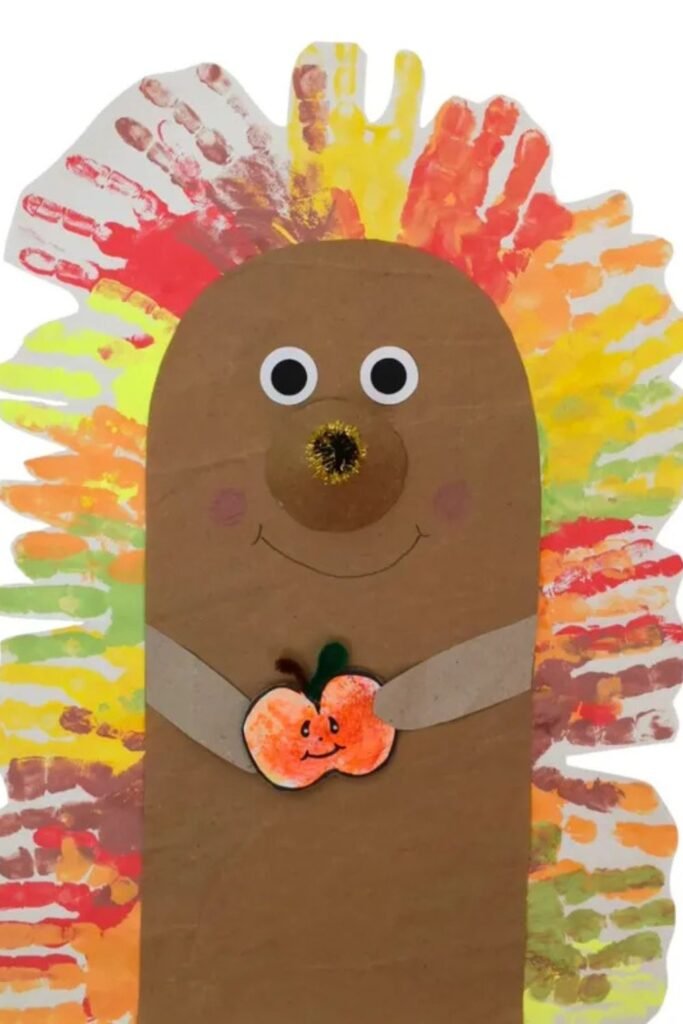
Handprint Spikes
Messy hands usually scare people off, but that’s exactly why this hedgehog works so well with kids.
Putting paint on young hands and then pushing them around a cardboard body makes the whole thing a game, not a precise craft.
The cardboard keeps the shape strong, and the handprints make spines that look real without cutting anything complicated.
This one is great for fall themes, family craft days, or making keepsakes because each hedgehog turns out differently.
Limiting the number of paint colors helps keep things from getting out of hand, and cleaning hands between prints keeps the faces clean.
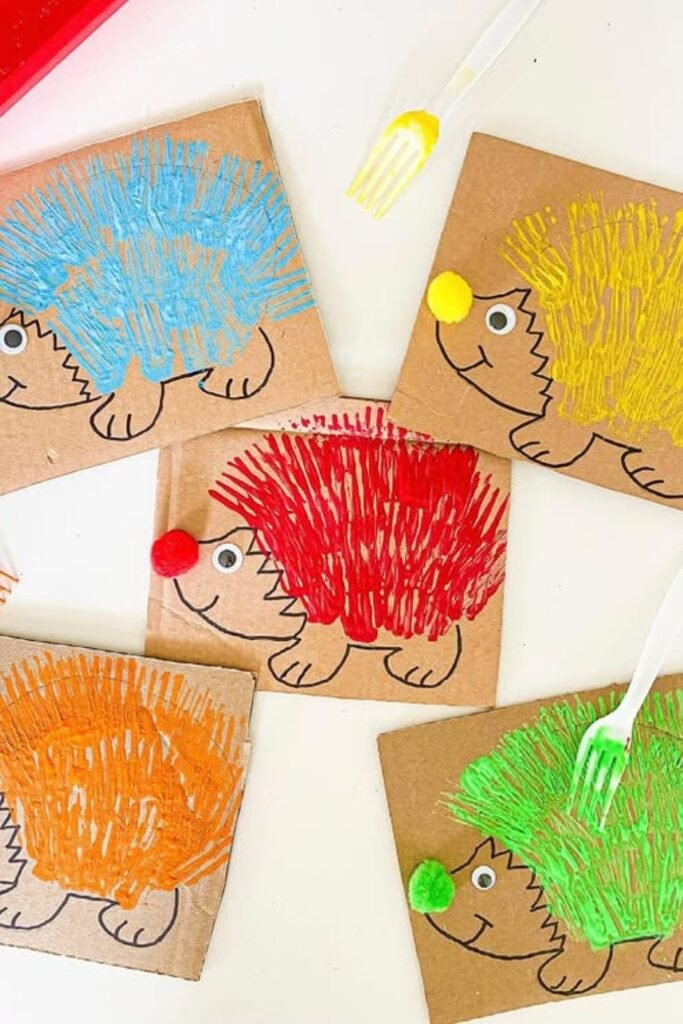
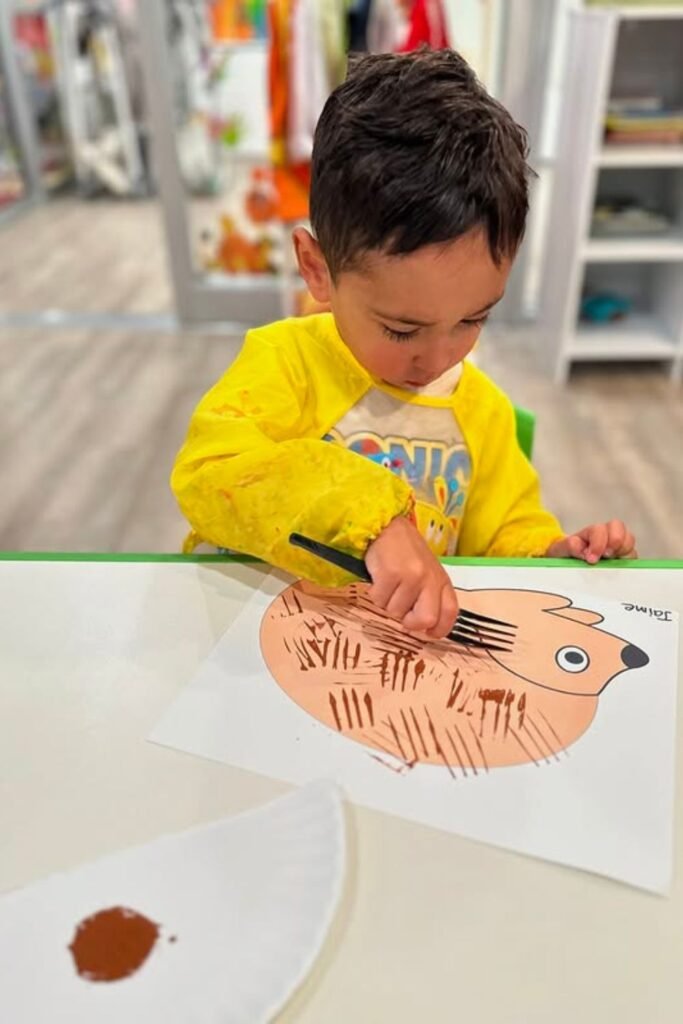
Fork Textures
Plastic forks turn paint into instant hedgehog spines, and kids catch on to this technique fast.
You can make elaborate lines without having to be careful or precise by simply dipping the fork and pulling it forth.
Cardboard is useful here since it can handle heavier paint and strokes without curling. This is excellent for short art sessions, days.
When you want to explore colors, or when you want a lot of kids to work at the same time without having to do a lot of processes.
Keeping the paint to one color per hedgehog makes the results bold instead of murky. Adding the pom-pom nose at the end provides them a distinct end point.
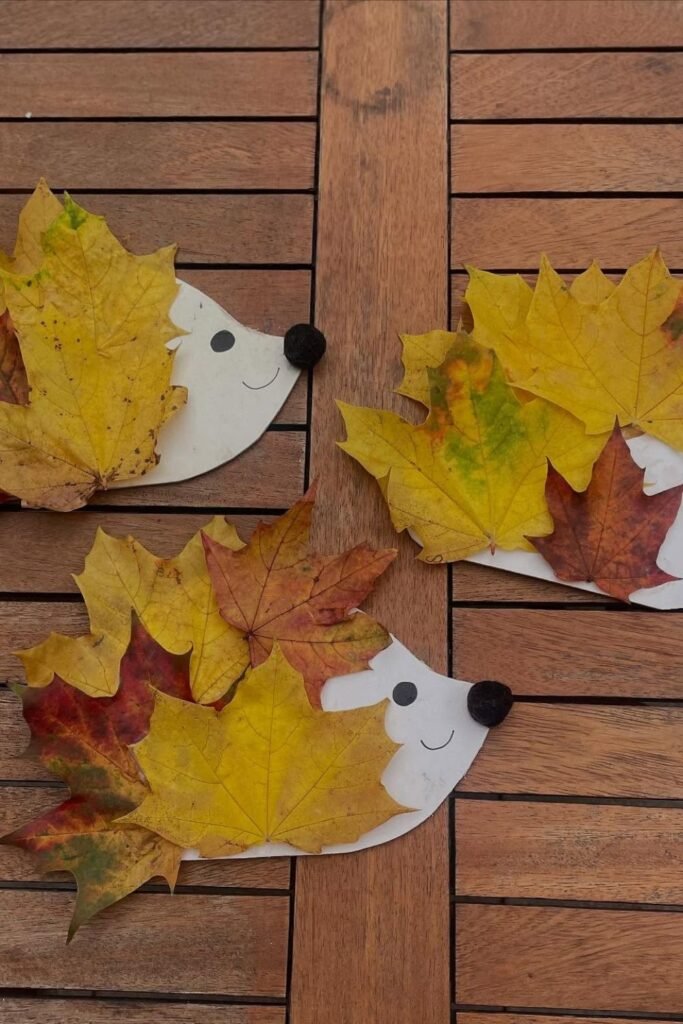
Leaf Layers
Autumn walks suddenly turn useful once kids start collecting leaves for a hedgehog’s back. Flat paper or cardboard bodies.
Keep this project simple. But genuine leaves do all the work without any extra effort. By putting larger leaves on top of smaller ones.
The hedgehog becomes a full shape. The tiny leaves on top create texture without needing scissors.
This craft is great for fall classes, nature days, or activities.That move kids from the outdoors to the indoors when they already have a lot of energy.
Before gluing, let the leaves dry a little so they don’t curl later. Also, put the face details last to maintain everything smooth and calm.
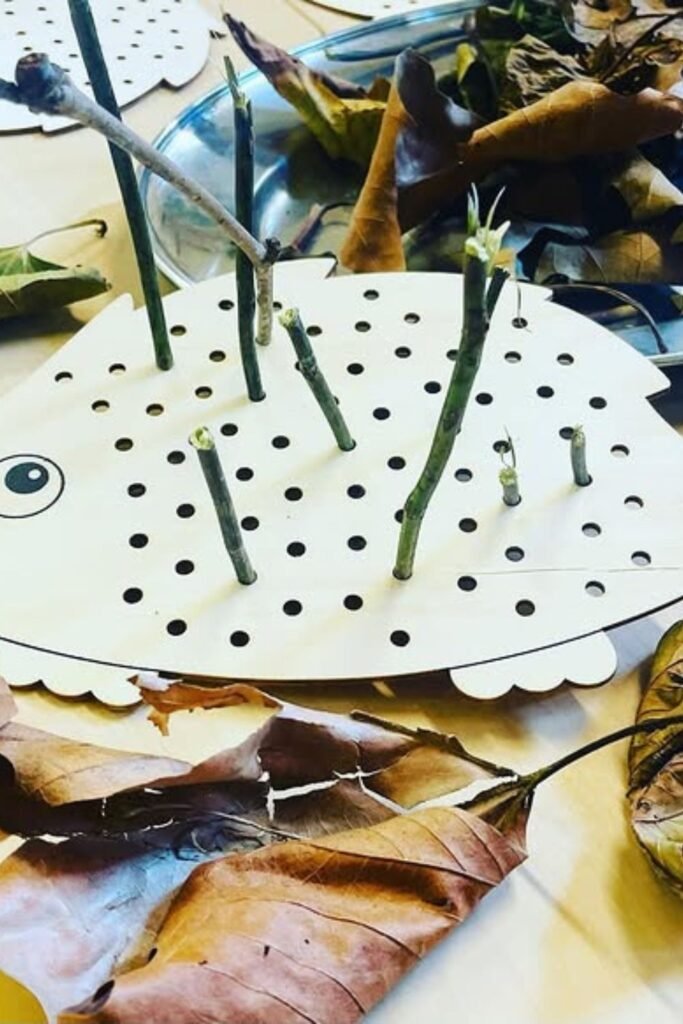
Stick Spines
Outdoor play blends naturally into crafting once sticks become the hedgehog’s spikes. Poking small holes into a cardboard or thick paper base.
Kids may push twigs in at their own rate, which keeps their hands busy without needing glue or paint.
Different lengths of sticks give each hedgehog a different texture and make them look a little wild on purpose.
This activity is great for lessons that are rooted in nature, forest schools, or quiet group work where youngsters can switch between gathering and making things.
Pre-punching the holes saves time, and putting a tray underneath stops leaves and sticks from falling all over the place.
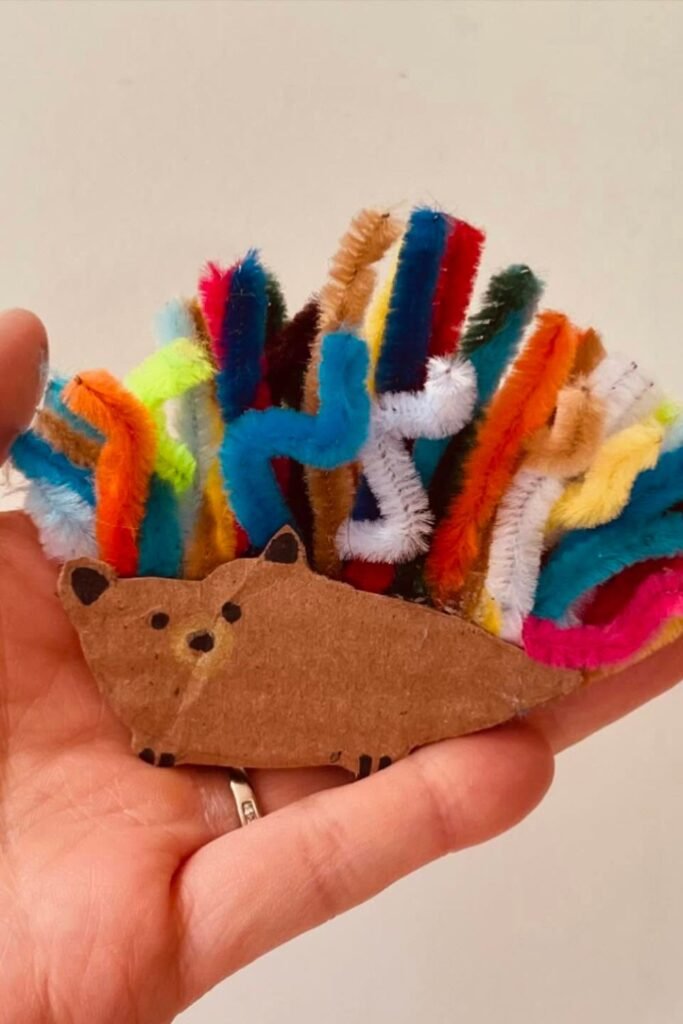
Fuzzy Spines
Color chaos works here, and that’s exactly why kids stay hooked. Pipe cleaners slide easily into small slits or holes in a cardboard body.
Offering quick height and texture without having glue drip all over the place. Younger kids do better with short pieces.
While bigger kids can bend, twist, and try things out with longer pieces. This activity is great for quiet-time bins, fine-motor stations.
Quick activities on a rainy day because it’s easy to set up and clean up. If you only use a few pipe cleaners on each hedgehog, it won’t get too big.
Also, mixing soft neutrals with bright colors makes the spines pop out without making the face look too busy.
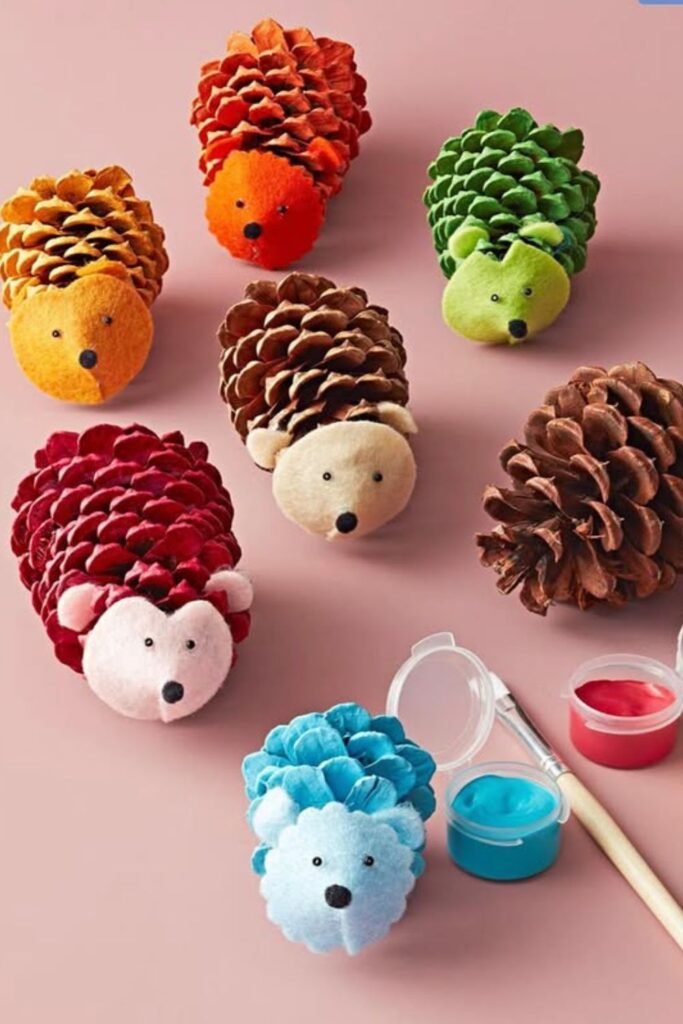
Pinecone Pets
Natural texture does most of the work here, which makes this one feel almost foolproof.
Kids can focus on painting and giving a soft face to pinecones instead of having to do everything from scratch.
Each pinecone becomes a little character when you glue felt or foam forms to the front. The size is just right for small hands.
This project works well for fall units, nature tables, or crafts that kids can take home because the end product feels complete and strong.
Before painting, make sure the pinecones are totally dry. Use thicker paint so it clings between the scales and doesn’t run all over the place.
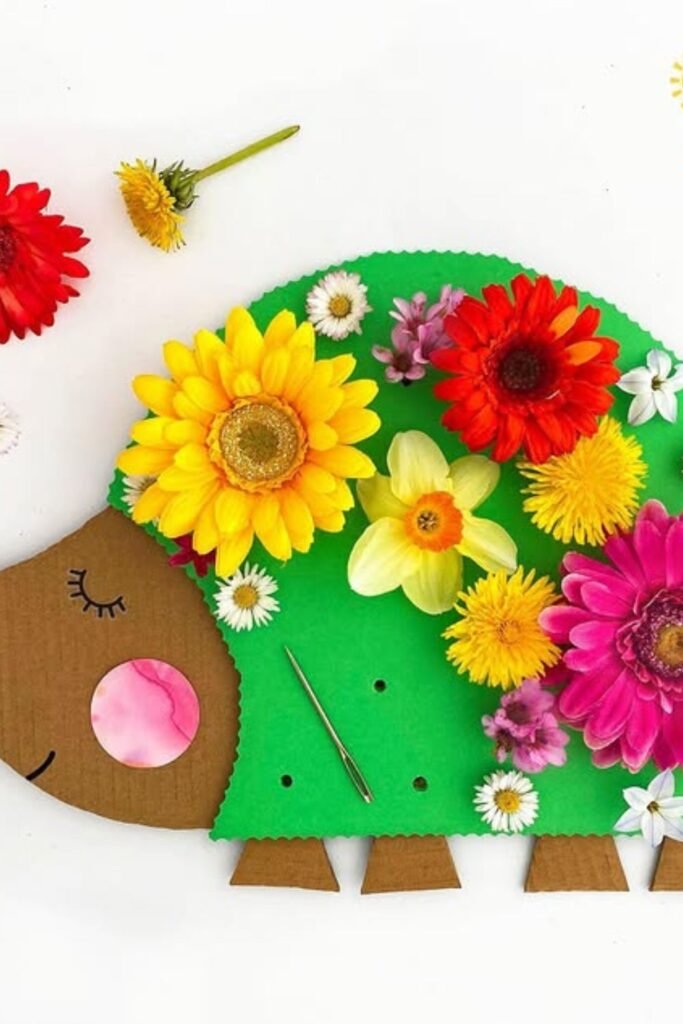
Flower Spines
Fresh blooms change everything in a kids’ craft, especially when they replace paper or paint.
Putting real flowers into a cardboard hedgehog makes the exercise a nice combination of natural play and art.
Little hands can focus on arranging instead of gluing since short stems fit easily into holes that have already been punched.
This idea is great for spring lessons, sensory play, or quiet creative corners where kids need to calm down.
Daisies and flat flowers work well, although thicker stems need holes that are a little bit wider.
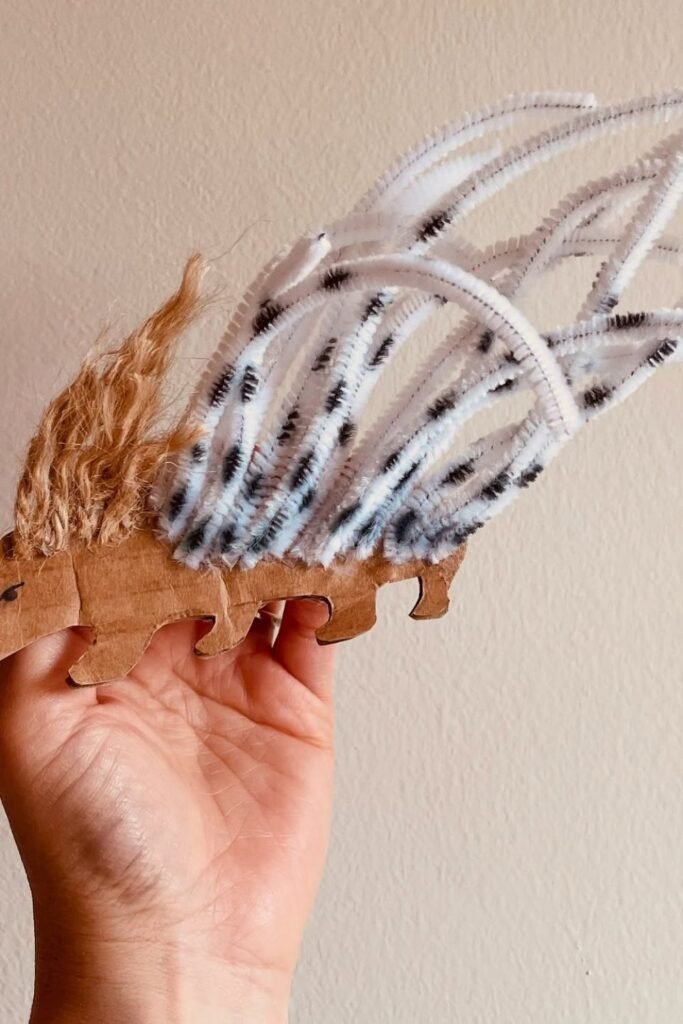
Wild Spines
Drama-loving kids usually gravitate to this one right away. Extra-long pipe cleaners pushed into a cardboard base.
Make a plain hedgehog look bold and fun, as if it’s in the middle of moving.
Here, cardboard is better than paper because the spines stand out a lot and need support.
This approach works best for older kids who like to try new things and don’t mind moving things around until they look “just right.”
Adding a few patterned pipe cleaners to a bunch of neutral ones saves it from looking chaotic.
The basic face helps balance out the wild back and focuses the focus on texture instead of too much adornment.
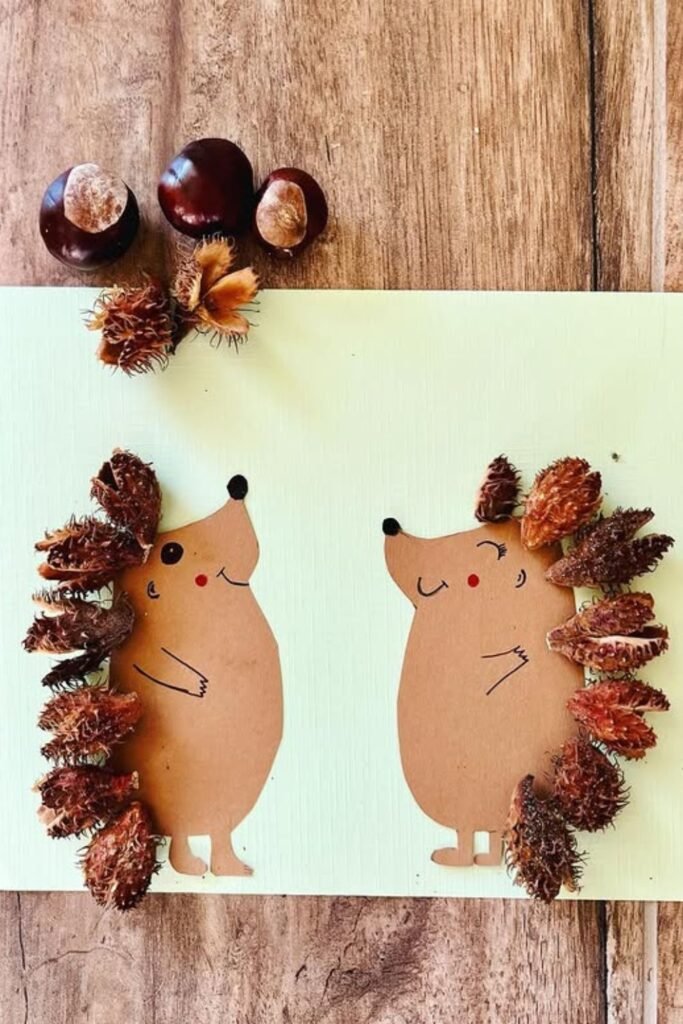
Seed Spines
Natural finds give this hedgehog a textured back without any complicated prep. Dried seed pods or chestnut shells line up easily along a cardboard body.
and quickly give kids a spiky look they know. A thin layer of adhesive works best because the pieces already have shape and weight.
This idea works well for fall nature units or calm table activities where kids may take their time and put each piece in the right spot.
Instead of a big mound of seeds, give them a tiny basin. This makes it easier to choose. Kids can see.
Where the spines should stop better when they draw the face first. This maintains the design balanced.
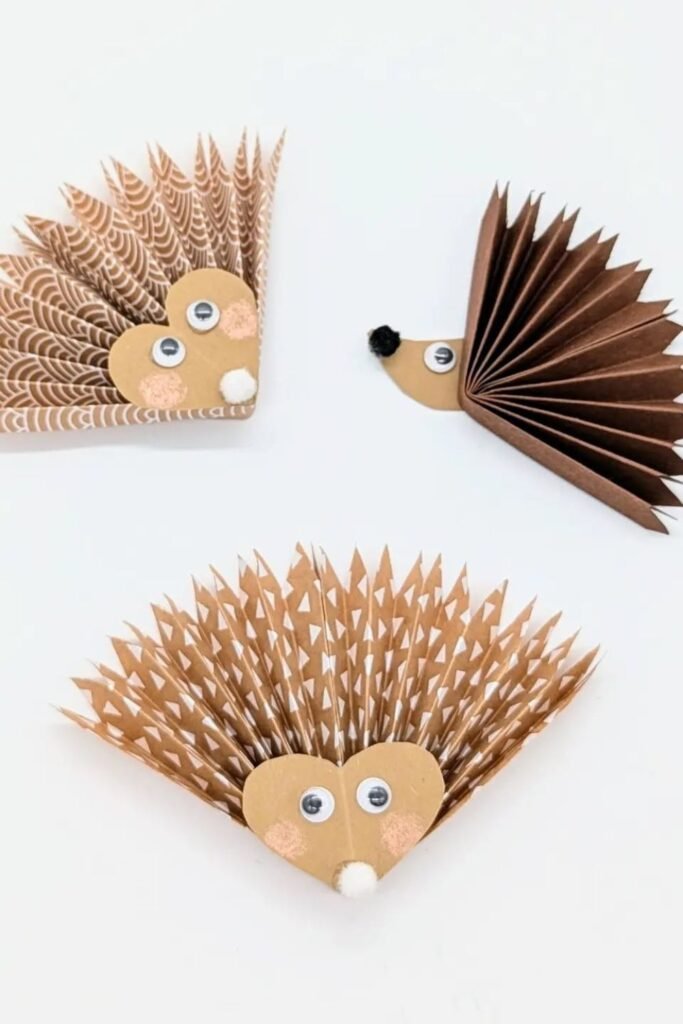
Paper Folds
Sharp folds instantly give a hedgehog its personality, and kids love watching flat paper turn spiky in seconds.
Folding patterned or plain paper into tight accordion shapes makes robust spines without needing glue or time to dry.
The best material for the face is cardboard or thick paper since it balances the weight of the folded back.
This technique works best for preschoolers and early elementary school kids who like to do things with their hands and see clear consequences.
The hedgehog looks clean and compact with smaller folds, but with larger folds, it looks bold and dramatic.
Rainbow Hands
Bright palms steal the spotlight here, turning a simple hedgehog into a keepsake kids love showing off.
You can make bold spines without scissors or complicated techniques by layering colorful handprints around a cardboard body.
When you paint, it’s best to do it softly so that the contours of your hands stay clear instead of dirty.
This idea works well in preschool rooms, fall schools, and family craft days because everyone can join it at their own leisure.
A tiny paper apple or leaf at the end offers them a definite end point and makes the hedgehog seem like it’s done instead of rushed.
Heart Spines
Love-themed crafts don’t have to feel cheesy, and this hedgehog proves it. Layered paper hearts give the back a soft, rounded look.
That youngsters can put together one piece at a time without being in a hurry. A cardboard or toilet paper roll foundation.
Keeps the torso firm while small hands put hearts in place. This is a great idea for Valentine’s Day activities, kindness weeks, or quiet inside crafting.
When you want to do something calm and concentrated. Using two or three different shades of the same color.
Keeps everything together, and adding the hearts from back to front helps the layers stay in place instead of falling off.

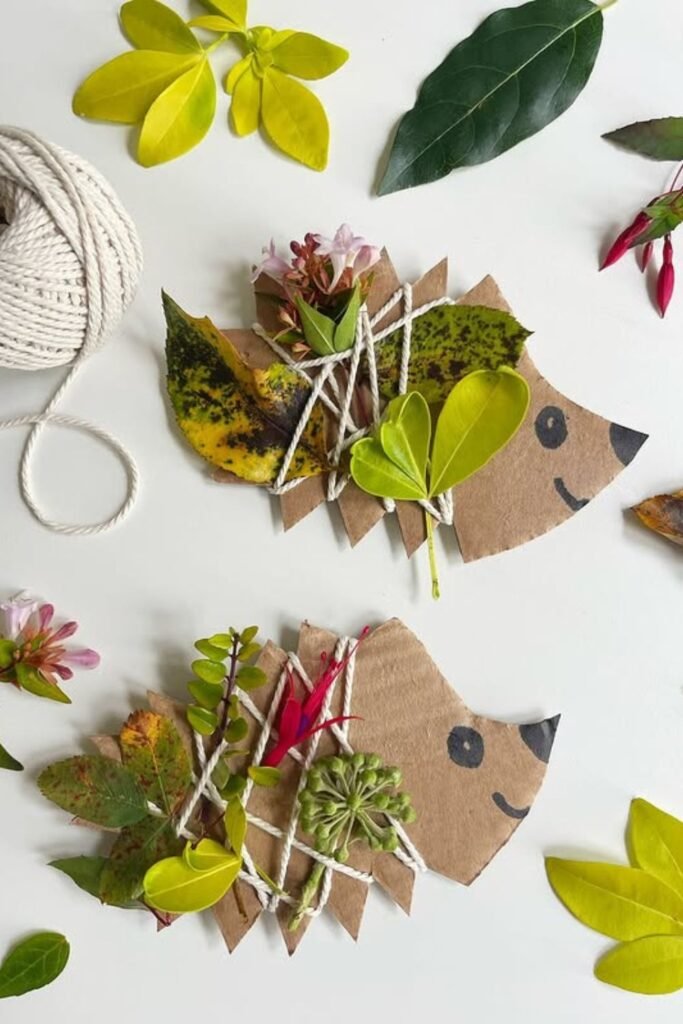
Nature Wrap
Loose leaves and string turn crafting into arranging instead of sticking. Wrapping natural finds onto a cardboard hedgehog.
This enables students try out several placements without having to commit right away, which takes the pressure off of getting it perfect.
Soft twine is better than thin string because it holds the flowers and leaves without harming them.
This technique works well for outdoor classrooms, nature tables, or art time that moves slowly, where students can trade pieces and make changes as they go.
Starting with bigger leaves makes a stable base, and then smaller pieces fit in organically.
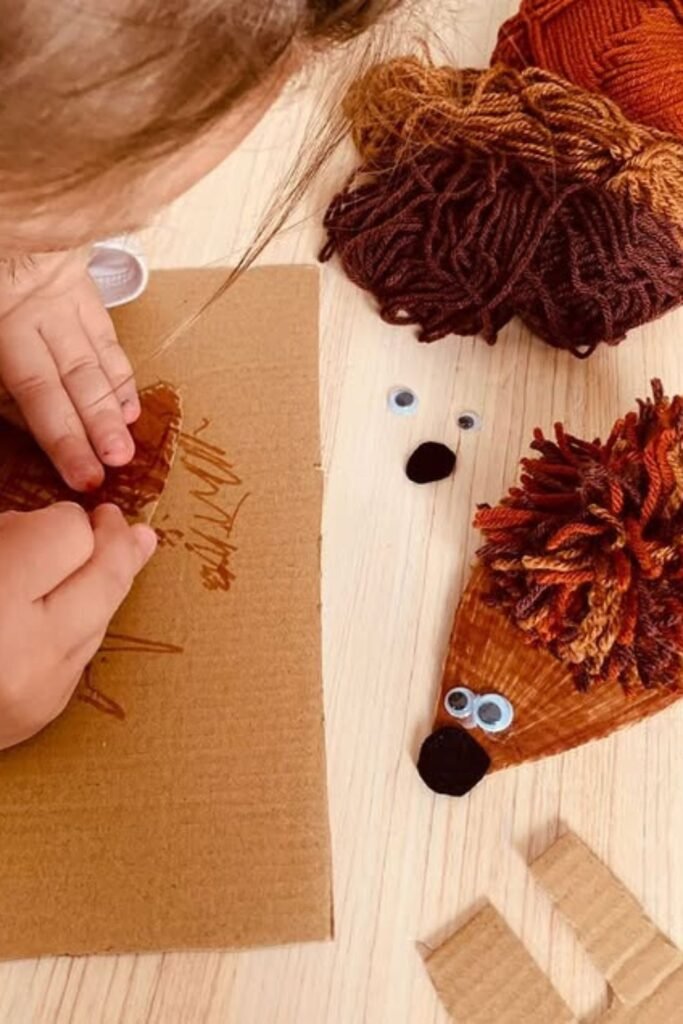
Yarn Spines
Soft texture changes the whole feel of this hedgehog and makes it especially inviting for younger kids.
You can make thick, soft spines without sharp edges or hard-to-use tools by wrapping yarn around cardboard or gluing on little bundles of yarn.
Short lengths are recommended so that the yarn doesn’t get tangled while kids are working.
This idea is great for quiet-time crafts, sensory exercises, or one-on-one tasks where youngsters can take their time and focus.
Using only warm, earthy hues on the hedgehog keeps it looking natural. Adding a few other colors makes it look deeper.
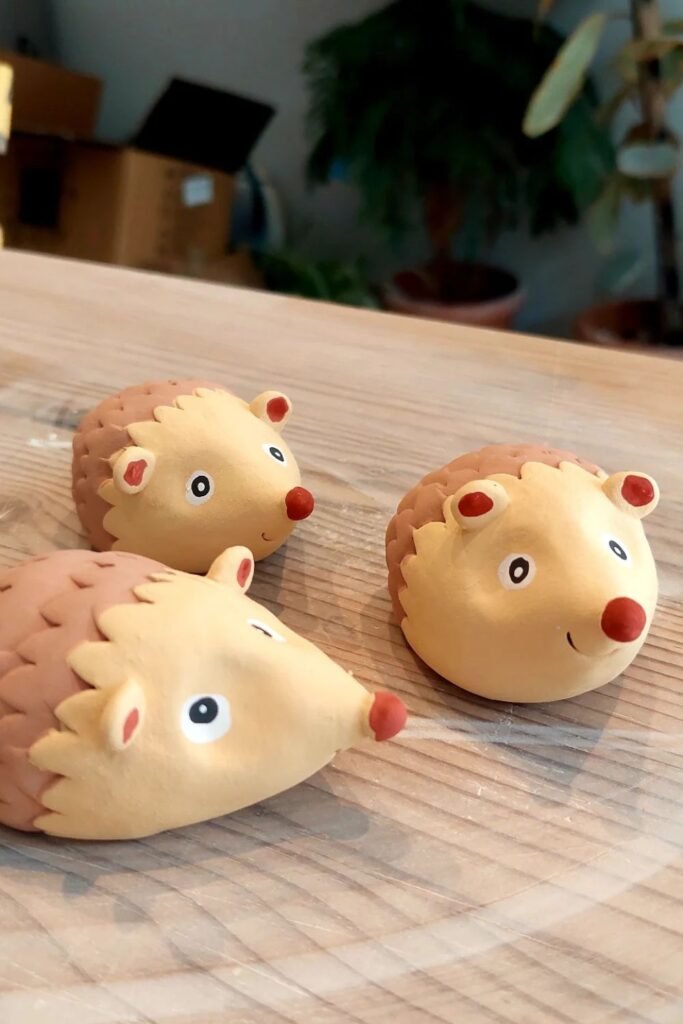
Clay Minis
Tiny hands usually take this one seriously, almost like they’re making a little pet. Soft clay or dough.
Kids sculpt the body first, then use little lines or dents to make spines without sharp instruments.
To make the hedgehog look friendly instead of lumpy roll the face smooth before adding embellishments.
This craft is great for small groups, tabletop activities, or days when kids need to settle down and focus.
Putting the eyes on last keeps them from smearing and gives youngsters a clear moment when the hedgehog “comes alive.”
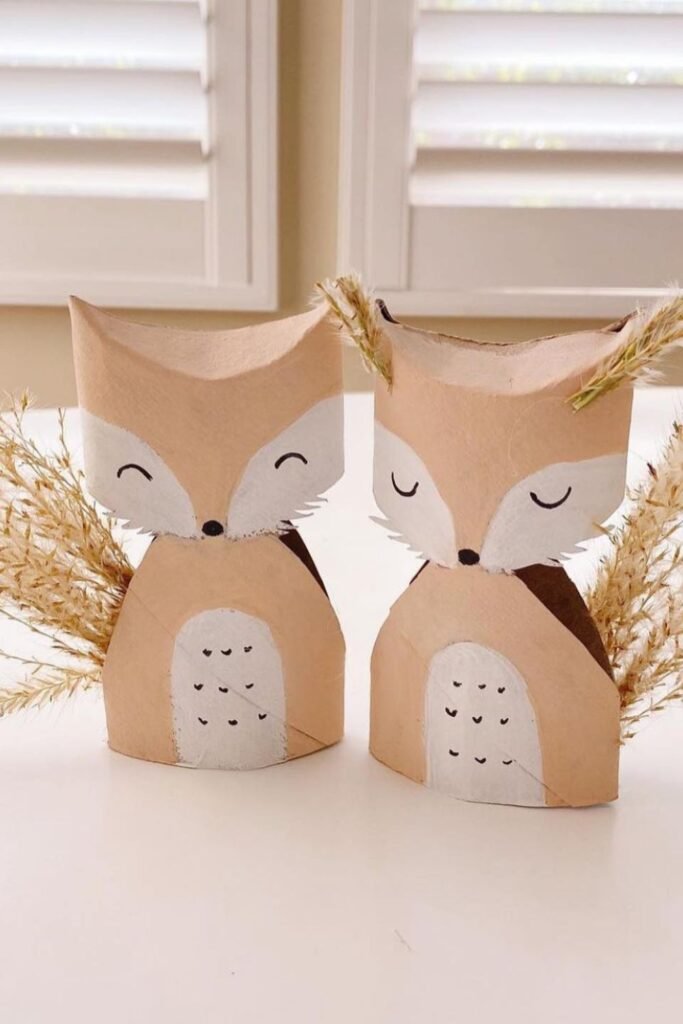
Tube Creatures
Cardboard tubes suddenly feel magical once they stop lying flat. Standing the body upright gives kids a new way to think about animal crafts.
and dried grasses nestled into the rear offer soft, natural “spines” without too much adhesive.
This idea is great if you want a project that you can do at your desk and that also looks nice.
Cutting the tube first helps shape the body, and then adding features to the face keeps kids interested before going on to texture.
This is a terrific choice for fall or woods themes, especially if you want something else than flat paper crafts. You can use grasses, wheat, or dried stalks.
Brush Marks
Focus shows up fast with this one, because every short stroke feels intentional. Using a brush or fork to pull lines across a printed or cardboard hedgehog.
Kids can practice control without having to make flawless shapes. The lines will stay visible instead of seeping in if you use thick paint.
This idea works well for preschool tables, fine motor stations, or quiet times when kids need something to do that is calming but yet hands-on.
Starting strokes from the back and progressing outwards makes the spines look real.
By keeping the body outline simple, youngsters can focus on the movement instead of the sketching, which makes the whole thing feel possible instead of hard.
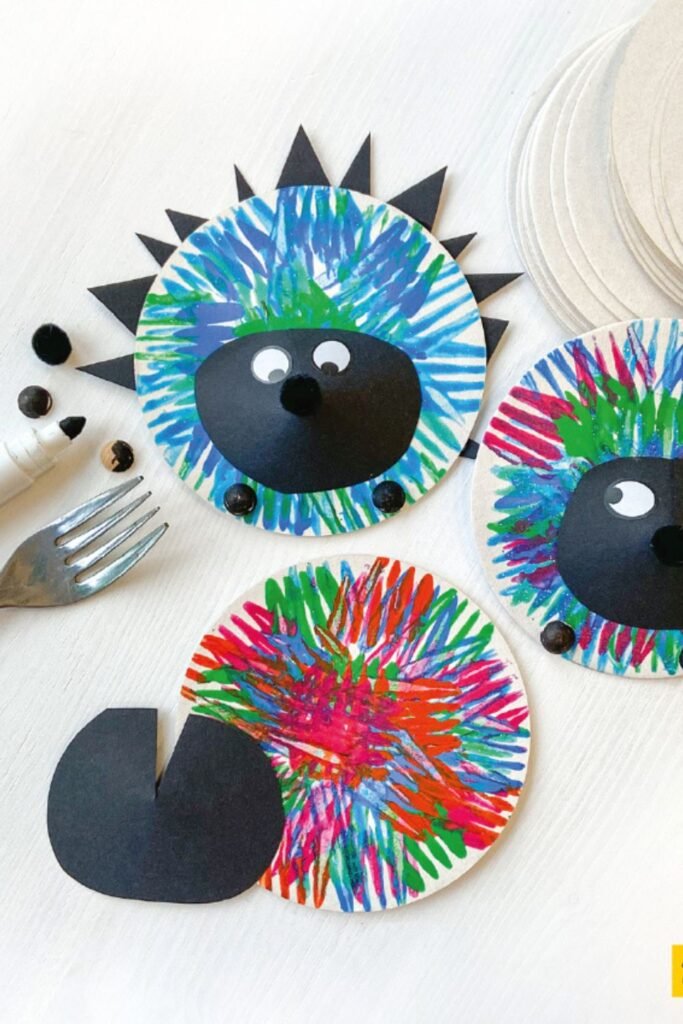
Scribble Plates
Color freedom takes over with this one, which is exactly why kids don’t want to stop. Letting markers or paint run wild across paper plates.
Makes random lines into hedgehog spines without needing to be exact. Adding simple triangle cutouts.
Around the edge gives the shape definition while keeping the process loose. This idea is great for art days, groups with people of different ages, or times.
When being creative is more important than getting things done perfectly. Kids may push hard on paper plates.
Without tearing anything since they are thicker than thin paper. Saving the facial parts for last helps everyone relax down after all the coloring.
FAQs
How do you keep hedgehog crafts from falling apart while kids are working on them?
The biggest distinction comes from strong bases. Thick craft paper, cardboard, or paper plates handle glue, paint, and pressure far better than thin sheets.
When the base is strong, youngsters can add spines and details without having to worry about things bending or sliding off in the middle.
What’s the easiest hedgehog craft option for mixed-age groups?
Crafts that use texture work best with people of different ages.
Younger kids can help with ideas that employ leaves, yarn, forks, or handprints without having to cut them up.
While older kids can add additional detail or layers.
The core premise is the same for everyone, however the level of difficulty changes based on age and skill.
Hi, I’m Afaf! I’m a law student who loves writing about everyday life – from home projects and crafts to fashion, beauty, and parenting tips.
I’ve been writing for over a year, sharing ideas that are simple, practical, and easy to try. I write about things I find interesting and useful, whether that’s organizing a space, trying a new DIY, or finding activities to keep kids entertained.
My goal is to share helpful ideas without making things complicated. If it works in real life, I’ll write about it.
When I’m not studying or writing, I’m usually experimenting with new projects or scrolling for inspiration!